Zip pouches make simple quick gifts and are a great way to use scraps of woven fabric. I recently made several quilts for gifts and a really cute owl pillowcase, which has left me with a lot of large scraps of woven fabrics. I'm seriously in love with this owl fabric and I wanted to use up every last little piece! Sadly it's out of stock now but they still have it in other colors.
Zip pouches are good scrap busters because they can be made almost any size. I have a small one, which was the first zipper I every installed (in a sewing class called "fearless zippers!") that I use when traveling to put earrings in so they don't get lost in my bag. Larger ones hold makeup or even bigger ones to hold an iPad or laptop!
You can use these same directions to make a pouch of any size based on size of scraps you have and what you want to use it for.
Materials needed:
Take your scraps out and cut strips which are all the same width, the length of your shortest strip is the maximum length your pouch can be. I used 3 strips, with the contrasting owl fabric in the middle. Sew your strips together with a 1/4 seam allowance, I use the edge of sewing machine foot.
 My scraps were long and skinny so I sewed them all together and then folded in half to determine the size of my pouch. Then I cut my lining fabric to the same size. The lining was also a scrap, a large one from the boarder of a quilt. I always buy extra so I don't run out and then have a bunch left!

My pouch was a little longer than my available 9in zipper so I added zipper tabs from 4 small rectangles of fabric. Alternatively if your zipper is too long, you can cut it to the right length.
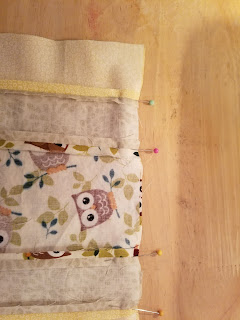
To make zipper tabs, cut 4 rectangles of fabric about 1 inch by 2 inches and sew right side to right side with your zipper edge in the middle. See photo below with the first rectangle pinned in place, the next one goes on top of it, right side down.

After sewing, trim out the seam allowance and fold the fabric back Then repeat on the other end of the zipper. When you are finished it will look like the photo below.

The tabs not only look nice but they can help if the zipper you have is too short. Keep in mind you don't want to use too short of a zipper because it will make the opening of your pouch too small.
Using a zipper foot you next want to attach the zipper to the exterior fabric.


Trim the seam allowance down in the corners to reduce bulk. In the photo below I could have gone a little closer on the right side!
 Pull your bag out through the gap you left in the lining. Put the lining inside the main pouch to check it the right size. If your sewing or cutting isn't accurate, it could be slightly too large.
If the size of the lining is acceptable, you want to sew up the escape hole you left in the lining. Pull the lining out of the bag and make sure the seam allowance is neatly folded to the interior. Press it to keep it place and pin it together.
Sew along the very edge of the bag, as close as you can get. This is where the edge foot is really helpful because you can move your needle to the left a little and then sew with your fabric edge running along the guide on the foot. This is one of my favorite sewing feet, it makes your sewing look amazing!
Give it a quick press and you have a cute pouch using your favorite fabric scraps! These are great for make-up bags, storing charging cables, pencil cases and many other uses. They are also a good way to use up additional cuts of cute woven fabrics!

Zip pouches are good scrap busters because they can be made almost any size. I have a small one, which was the first zipper I every installed (in a sewing class called "fearless zippers!") that I use when traveling to put earrings in so they don't get lost in my bag. Larger ones hold makeup or even bigger ones to hold an iPad or laptop!
You can use these same directions to make a pouch of any size based on size of scraps you have and what you want to use it for.
Materials needed:
- Strips of scraps (or scraps you can make into strips)
- Matching thread
- Zipper (mine was 9 inches, I buy them in bulk from Amazon)
- Lining fabric (I used a larger scrap)
- Zipper foot
- Edge foot (optional but really helpful)
- Sewing Machine (I have this one)
Take your scraps out and cut strips which are all the same width, the length of your shortest strip is the maximum length your pouch can be. I used 3 strips, with the contrasting owl fabric in the middle. Sew your strips together with a 1/4 seam allowance, I use the edge of sewing machine foot.


My pouch was a little longer than my available 9in zipper so I added zipper tabs from 4 small rectangles of fabric. Alternatively if your zipper is too long, you can cut it to the right length.
To make zipper tabs, cut 4 rectangles of fabric about 1 inch by 2 inches and sew right side to right side with your zipper edge in the middle. See photo below with the first rectangle pinned in place, the next one goes on top of it, right side down.

After sewing, trim out the seam allowance and fold the fabric back Then repeat on the other end of the zipper. When you are finished it will look like the photo below.

The tabs not only look nice but they can help if the zipper you have is too short. Keep in mind you don't want to use too short of a zipper because it will make the opening of your pouch too small.
Using a zipper foot you next want to attach the zipper to the exterior fabric.

Then you want to attach the lining to the zipper with your zipper foot. It helps me to figure out how to orient the pieces by checking how it will look when it's opened up and make sure it's correct.

Then you do the other side, sew the exterior and lining. It will look like the image below, the lining is on the back. Looks cute huh?

Next, unzip the zipper. This is really important or you will have problems turning your bag. Flip your lining up so the lining is right sides together and the exterior is also right sides together. It will be kind of like bat wings and look like the photo below.

Pin it in place. Sew along the edge with a 1/4 seam allowance, making sure that you use care when going over the zipper area. I usually stop sewing and use my hand wheel to go over the zipper. When you get to the lining, you need to leave a 2-3 gap so you can turn the bag. I like to leave this in the middle, not too close to the corners.

Trim the seam allowance down in the corners to reduce bulk. In the photo below I could have gone a little closer on the right side!

 |
| Edge foot |
Sew along the very edge of the bag, as close as you can get. This is where the edge foot is really helpful because you can move your needle to the left a little and then sew with your fabric edge running along the guide on the foot. This is one of my favorite sewing feet, it makes your sewing look amazing!
Give it a quick press and you have a cute pouch using your favorite fabric scraps! These are great for make-up bags, storing charging cables, pencil cases and many other uses. They are also a good way to use up additional cuts of cute woven fabrics!
Comments
Post a Comment